Some of you know I'm passionate about astronomy, specifically Astro-imaging. Last Friday, we saw a sign that ragnarok is coming, the end of the world is upon us. Surely that's the only explanation, for what I see in the skies: CLEAR SKIES! You guys don't realize how bad the weather's been the past year!
Anyway, so I took out the scope, one of my targets is to try and image the ISS. No luck yet, but I did find software that can assist to do this (my scope is fully computerized) however I cannot attempt as once I align my scope and install the special camera, I need to focus and this camera (basically a webcam, great for this type of object) needs either a planet or the moon to set the focus, and neither is available from my location (venus is too low and access to Saturn is blocked by my house at the time I can image the ISS).
WHATEVER....
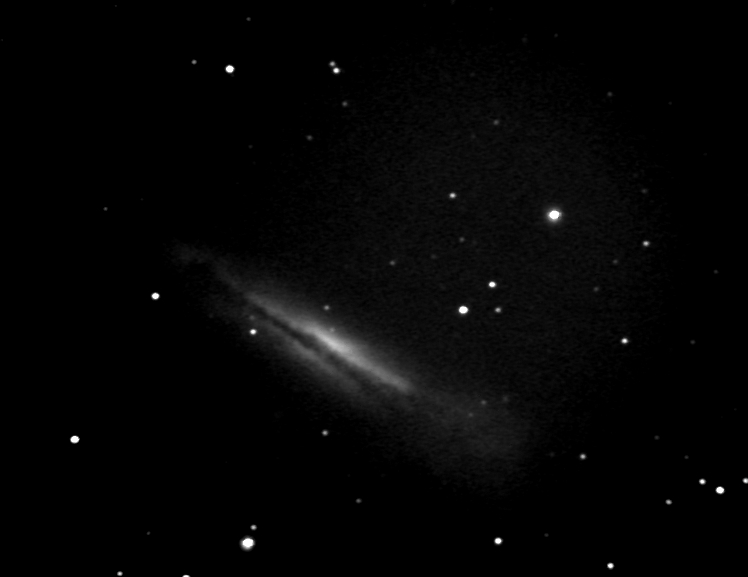
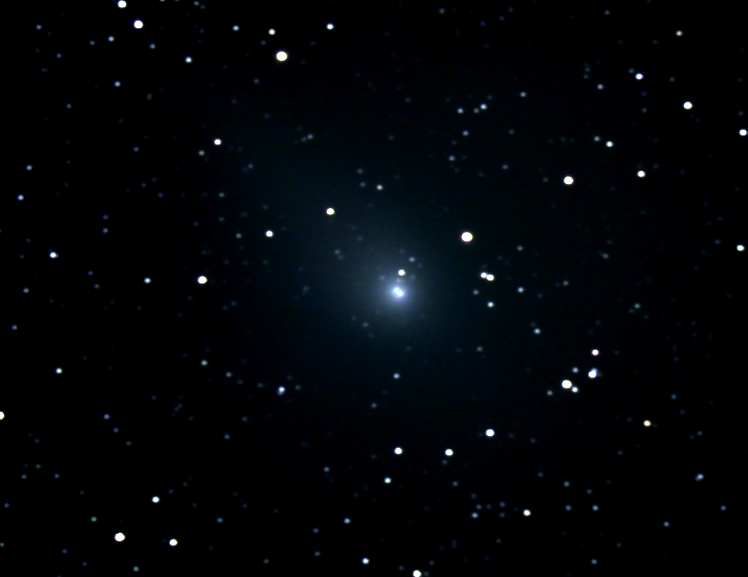
All this to say, I did image a lot of stuff and am quite excited and "hungry" for more. What a week we're having, why did I have to be stuck at work until 10:00pm? . Anyway, enjoy, please do comment on them.
Couple more. These aren't final, they're quickly processed to give me an idea on how my data is (average about 800 megs per pic!!!).
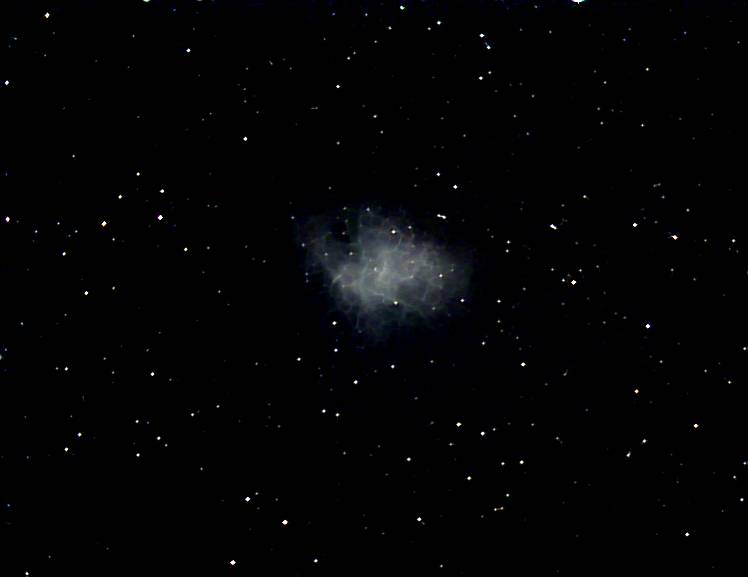
... well, except for the Crab Nebula, I gave special attention to that one.
p.s. for those who aren't aware, the Crab nebula was originally documented by both the Chinese and Arabic Astronomers back in... 1054AD!!! The originator star went SuperNova, which resulted in a new star visible to us, in broad daylight! 900 years later, astronomers put 2 and 2 together and realized the nebula is the "left over" from that star's explosive end.
Own Magic, Star Gazer, Batman Forever, STTNG, Mystery Castle (project)
Gone Fairy, Secret Service, Meteor x3, Title Fight, Eight Ball Deluxe, Bone Busters Inc., Seawitch, Starship Troopers, Strange Science, Arena, Hook, Pin*Bot x2, Time Warp, Motordome, Robocop, Black hole, Jurassic Park , Wipe-Out, Pinball Pro: Challenger I, Swords of Fury, Stargate, Party Zone
The resolution is rather low, my camera of choice is a DSI-2 Color (a one-shot camera, good for lazy bastards like me eheh). I think the rez is 748 X 580 or something like that. The camera is a dedicated CCD Astrocam, it's not usable in anything other than connecting to a laptop via usb and plug into the telescope. The advantage is it's very sensitive to light. which is necessary as deep sky objects like galaxy are millions of light years away.
So anyway, the way it works is my scope is presently set up via alt-az, which limits exposure length to about 30 seconds on a good night, but sometimes 22 seconds (which is what I used for the pics above). Each "pic" comprises of two different files: one mono about 1.7 megs in size (which is more sensitive and thus can have a bit more info) and one color which is 5.1 megs in size (basically a combine of red/green/blue. Alright, now I start taking the pics, I’ll try and get at least 70 or so different frames, in the hopes about 40 are usable (error can creep up in the tracking which messes some of the pics, this is normal). Once that’s done, I need to combine all those pics (called “stacking”) to get a final one frame. The file size of the final file is the same as one frame BUT it has information from several different files so it’s better quality.
Stacking: In case you aren’t familiar, consider this: because of atmospheric conditions, parts of the one frame aren’t of even quality as the others. So by comparing a bunch of different pics of the same object, you’re able to get a better, cleaner picture, all done through software (but with some manual selecting of frames).
Typically, what I should do is stay with one object the entire night, keep getting pics until I have over 100 of clean great frames with no star streaking, but I’m kind of at the stage where I want to image more stuff, so I tend to cheat a little bit and settle for less. Another thing I need to do that will see a HUGE jump in quality is set up my scope via a wedge mount. Doing so, if properly aligned, will enable me to get a lot more data which will help the color and detail (color is hard to get because the light is so faint due to distance / magnitude level). I do have a wedge mount, my plan was to first learn the easier way (alt-az is SUPER easy to set up and align, takes 10 minutes max!). Now that I’m more comfortable, I plan to give it a try this summer.
- I set up the scope on my deck (beside the dining room). First the tripod, I ensure it’s level, then I set up the scope itself on top and tighten the 3 bolts so the scope is snuggly attached to the tripod - I install the various scope hardware, such as the visual back that allows me to install the diagonal mirror, which I then attach an eyepiece. I’ll also attach a few other items such as cables that I’ll need to plug in my USB to serial adapter (for the scope control software I run from a laptop) and also the USB cable for either of my astro cameras and finally the cable to connect my micro-focuser. - I align the scope. Celestron CPC800 in alt-az mode has a super easy way to do this. As long as the scope is level (it has a bubble level on the tripod, so easy), all I have to do is point it at 3 different objects such as a planet or stars, typically in 3 different areas of the sky, in sort of a triangular pattern (that works for me perfectly). Ie: they need to be eyepiece, I press one button, then I do fine adjustments so it’s in the middle, press another button on the hand remote and that one object is done. Do this 2 more times and the alignment is complete. Once that's done, the scope's computer, using the built in GPS and its database of over 40 thousand objects, figures out where everything is and that’s it. Sometimes, like 3 years ago, it would fail on align every now and then but I never have a problem any more, easy as pie. I was probably either not centering the objects enough or taking too long between the 3 different stars or perhaps I wasn’t taking the stars far enough from each other. - So the scope is aligned, I can now keep on viewing or if I’m imaging, the next step is to remove the eyepiece and diagonal and install the astro cam. To go to any object, I can just select the object on the hand controller, select goto and it will slew to it automatically. The CPC800 is a great scope, the object is usually located near the middle of the field of view (FOV).
Or…
- Next step: start the laptop, start my favorite software (Starry Night Pro) and “connect” the software to my scope which is awesome if I’m imaging. Why? Because once I set up the scope and align it, there’s no need to go back outside, I run EVERYTHING from my dining room table (I mean … er… my observatory). Adjusting the focus, slewing from one object to another, taking the necessary pics, everything.
- Once that’s done, I can simply select the object that’s on the screen by right-clicking on it and select “slew” and the software will tell my scope where to go. After going to the first object, I’ll do a little adjustment to get it centered on the laptop screen and I’ll usually select the option “sync on”. This reaffirms that both the software and scope are agreeing on what where its pointing and voila, the rest of the night I get near perfect goto (ie: it will be in the FOV but sometime I have to do minute adjustments to get it right in the middle). This is no mean feat, the FOV for an astrocam like the Meade DSI2C is very narrow!
- Now’s the time to take the pics using the meade DSI software. They recommend to do some of the stacking right from the software but I find after 15 frames you start to get too many errors so I do all my combining through post processing technics afterwards using a great software called: MaximDL (the company Cyanogen is located right here in Ottawa!). It was expensive but man was it worth it.
- Lastly is the post processing which I mentioned in the previous post, MaximDL is awesome but there are also other great programs too.
That’s about it, my hands hurt from the typing! eheh
... well, except for the Crab Nebula, I gave special attention to that one.
p.s. for those who aren't aware, the Crab nebula was originally documented by both the Chinese and Arabic Astronomers back in... 1054AD!!! The originator star went SuperNova, which resulted in a new star visible to us, in broad daylight! 900 years later, astronomers put 2 and 2 together and realized the nebula is the "left over" from that star's explosive end.
I always wondered how, living in a built up area, would light pollution affect star gazing?
Light pollution has a tremendous effect for sure, but with imaging, you can compensate with longer exposures and then good post processing to remove grain and other effects of light pollution (and good use of filters can go a long way too).
One of the best pics I've seen is of the Horsehead nebula, taken from a local chap named Albert Saikaley. It's beautiful, has incredible detail and he took that pic with a $600 scope (with a damn good mount that could track like no other... and a great camera but that's beside the point ). You know where he took that pic? Right off Riverside drive in Ottawa, so light pollution can be worked around to some extent. Naturally, nothing beats dark skies, but it's not something that's killing.
Too bad you live sor far, I would have loved to take a look into your eyepiece.
Just an 90 minutes away, not that far . Truth be told, I REALLY need to get my scope's optics cleaned up, the thing is filthy! My scope (I named her Seymour... you know, because I can "see more" ) has a corrector lens on the front of it. I think that, along with adjusting the alignment of the mirrors should get me some better pics but for observing, it's kind of in an ugly state.
I've always had this fear of messing it up, kind of how I felt when starting to mess around with my Firepower, afraid to make things worse. When I initially got the scope, I saw a spec of dust on the corrector lens. I've heard a thousand times: Be careful with the corrector lens! SO, I used a can of compressed air to blow away the dirt. Next thing you know, some @#@#% GUNK flies out of the can and hits the corrector lens. I freaked out. I didn't want to make things worse so I didn't touch anything else and brought it in to Focus Scientific to have it cleaned by the staff. Thankfully that gunk didn't do any permanent damage... except to my bravery, now I'm afraid to clean it (for the record, a mixture of a type of alchool, water (distilled?) will get the job done, so I'll take care of that sometime next month...
I don't have access to a lot of my pics (I'm at work) but here's one of my favourites: a Waxing Crescent moon. A lot of work out of this one, as this is a mosaic of about 40 pics stitched together (I forget how many), taken back in March 2007. This is a compressed version but it didn't lose too much detail... note: make sure you expand on the pic to see the full rez
Own Magic, Star Gazer, Batman Forever, STTNG, Mystery Castle (project)
Gone Fairy, Secret Service, Meteor x3, Title Fight, Eight Ball Deluxe, Bone Busters Inc., Seawitch, Starship Troopers, Strange Science, Arena, Hook, Pin*Bot x2, Time Warp, Motordome, Robocop, Black hole, Jurassic Park , Wipe-Out, Pinball Pro: Challenger I, Swords of Fury, Stargate, Party Zone
Reminds me of a story, I used to have an 8" SCT telescope about 20 years ago. So I was trying to see how close I could see the apartment that was about 1km away. Well, I found out I could tell the time on the clock of one of the apartments! As I’m about to show my wife how cool that is, I came to the realization this would be difficult to explain to a police officer so I said “what the hell am I doing” and proceeded to move the scope from it’s horizontal positioning to one pointing at the heavens. I ain’t no peeping tom but I have to admit it was cool to see up close (though everything was upside down, SCT scopes flip the image).
Here’s a couple more pics.
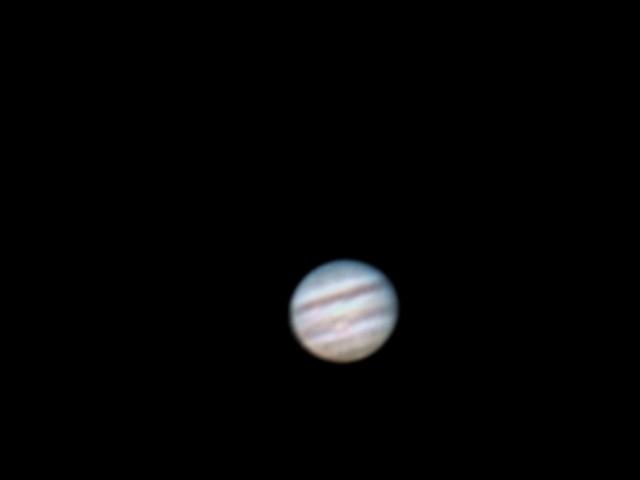
Jupiter GPS (Great Red Spot). This was actually taken with my canon powershot pointing at the eyepiece of my telescope (using the video mode so I can stack the images later to get more detail)
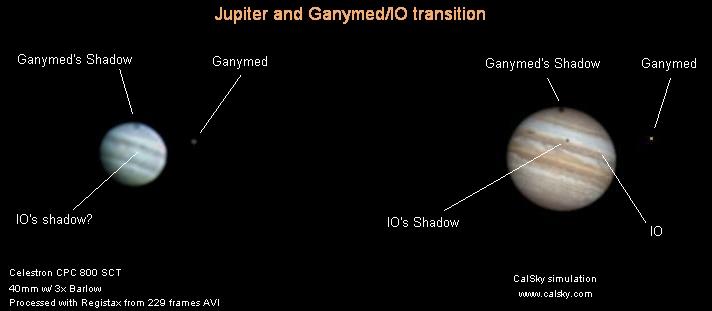
Jupiter Ganymed-IO: The pic on the left is mine, the right version is a computer simulation. It’s there to help you identify what you can see on my pic and what is there is neat: you can see Ganymed and its shadow on the disc of Jupiter, EXACTLY where the simulation said it would be. Gotta love http://www.calsky.com for the assistance with the simulation; works to help identify the plane of Saturn’s Rings, the phases of the moon, the movement of Jupiter’s moons, the detail on Mars, etc.
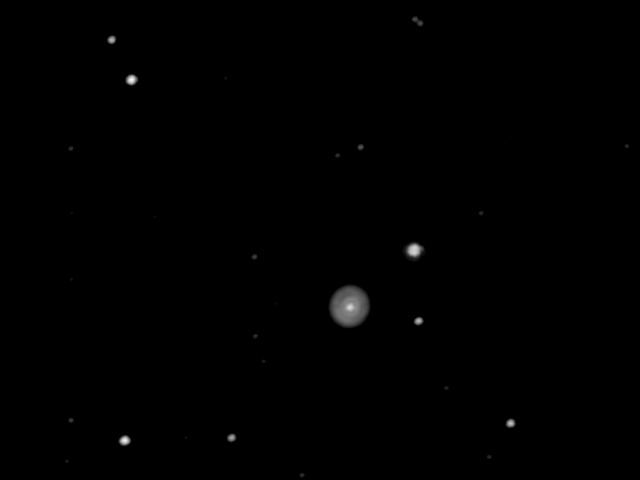
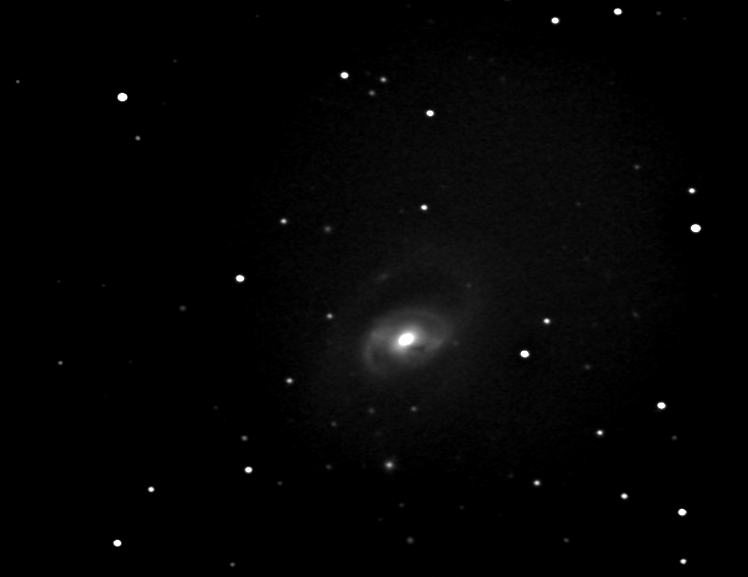
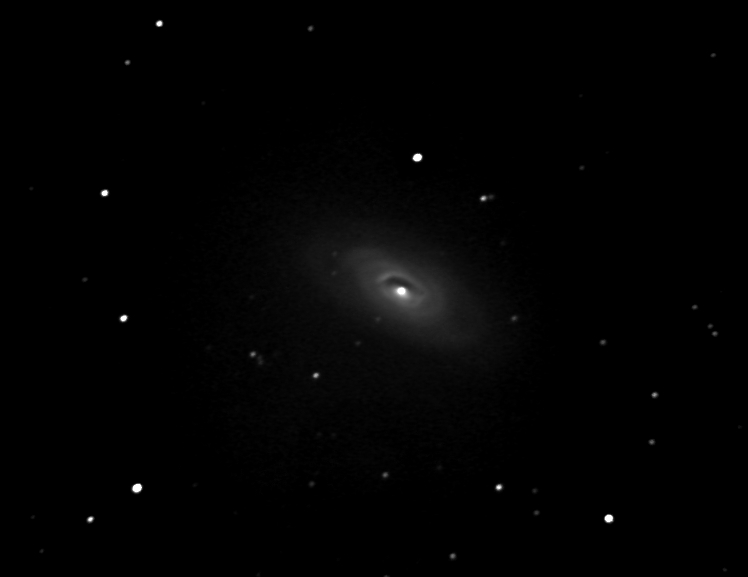
M64 – the blackeye galaxy (appropriate name!)
Comet 73p fragment B: This is a cool picture. The streaks are from the comet’s movement over the time of taking pics, I actually have a small AVI animation of the movement of the come through the star field. It’s a low res pic, not much of a tail (you really need either a bright comet or to do longer exposures) BUT there is one cool detail, if you take a close look, you can see two jets emanating from the nucleus (two dark streaks – one going down, one going up). I’m not sure if that’s what that is, but it seems to be anyway.
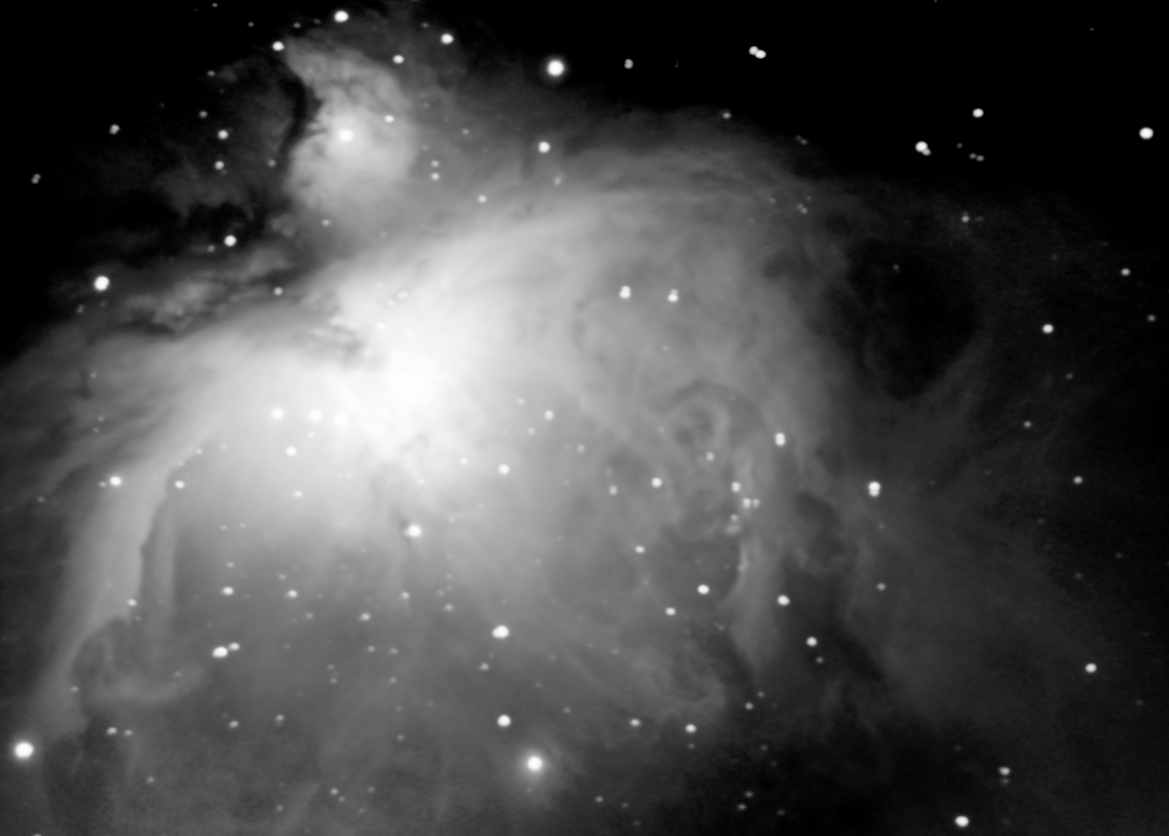
M42 Mosaic: The great Orion nebula: This is a WIP mosaic, I’m trying to get around the narrow field of view by doing a mosaic (stitching the different pics together through software). It’s a long and tedious task and you really need good quality frames. I’m not done yet…
So cool.. so is your telescope pretty high end? What would I be looking at if I wanted to pick one up to look at this stuff while I'm camping? (I live in the GTA, so looking from home probably isn't much of an option)
Own Magic, Star Gazer, Batman Forever, STTNG, Mystery Castle (project)
Gone Fairy, Secret Service, Meteor x3, Title Fight, Eight Ball Deluxe, Bone Busters Inc., Seawitch, Starship Troopers, Strange Science, Arena, Hook, Pin*Bot x2, Time Warp, Motordome, Robocop, Black hole, Jurassic Park , Wipe-Out, Pinball Pro: Challenger I, Swords of Fury, Stargate, Party Zone
For viewing, Celestron have this awesome NexStar SE model. They are fully computerized (has the goto I explained earlier). Prices are reasonable, $1400 (US) for the 8” model, see the link for more info: http://www.celestron.com/c3/category.php?CatID=13. Some love the small dobsonian mounts, these scopes are easy to log around and great for observing but again, you need to know your constellations if you’re going to go without a goto scope.
If you plan on taking astro photography at some point, then I’d recommend one similar to my own: the CPC series, $1800 (US) for the 8” model. I don’t recommend larger as it gets a bit tough to move it around (it’s not light!): http://www.celestron.com/c3/category.php?CatID=9 . The mounts are pretty good and astrophotography is a possibility because of the dual fork mount.
If you have the patience to learn the constellations, then you can star hop with just a small scope, a computerized scope if not needed and you can get a good scope for $400. However, if you’re not the most patient or if you want to maximize your available time, a goto scope is just awesome.
Visual versus photography: Not sure if you’re aware, but outside of the planets, a few globular clusters and the moon, most items either show up as a grey/green misty cloud with no detail so visual observing can be somewhat disappointing to many people. I still find it awesome, but that’s me, but nothing beats astro photography… it can be very rewarding.
Cheap scope: to anyone reading, do not fall for the “powerful scope” and the magnification. Scopes have a limit of how much you can magnify what you are looking at. Also, nothing beats good optics. In saying that…
A few years ago, I had a 4 1/2” Newtonian reflector. It was ok for the moon and nothing else (you’d see 2 cloud bands on Jupiter and its moon). I bought a motor drive because I wanted to dabble in astrophotography (with my canon powershot). It was a disaster with the low point, me spending about 3-4 hours at minus 30 degrees weather trying to take pics of Saturn. All I could get is a smear that hinted at the rings, it was disappointing. The motor drive (about $80) was good enough to track the object visually but nothing else. I guess I’m too hard on it, it was a good scope but I just outgrew it. Anyway, during that 3-4 hour disaster, my wife kept on checking up on me to make sure I wasn’t dead or passed out from the cold. It was that bad but the silver lining is that I said “never again will I attempt to do something it’s not designed for” so I was motivated to find a better solution.
Before I bought my CPC800, I was at Costco one day and they had a celeston 60mm refractor with a goto handcontroller. It seemed a bit flimsy but I bought it, can’t go wrong for $200. Let me tell you, I couldn’t recommend it enough, in that first night I used it, I saw more items I ever saw COMBINED because of the GOTO, which wasn’t perfectly accurate but it got you close enough that it was VERY usable. Also, the optics were great, I remembered why refractors have their fans, as viewing the moon through it produced an awesome view, I’d say better than my existing scope (that’s just how refractors are). You can’t get aperture with a refractor though, the scope would be too big thus why I upgraded but anyway, point is the mount isn’t good enough to do photography (well, not true, I took pics of the sun with it but it’s not designed for camera’s mounted to it) but for viewing it did the job. Still, because of the small size, you can’t magnify too much as it gets very blurry, so again, temper expectations for what you will see. But for observing the moon? Awesome scope. This link was of a similar model, mine was discontinued: http://www.celestron.com/c3/product.php?CatID=55&ProdID=519
I then moved on to the CPC800, paid about $2600 (CAN). Add an $730 DSI2 color camera, a $150 micro-focuser (not required but convenient), another $150 for the different “webcam” type of camera, software for post processing, etc etc and this hobby is not cheap. But I’m happy with the results I got so for me, it was money well spent.
I swear though, every now and then, the scope says to me: “feeed meeeeeee”


 The Loafer
 Male
Male


 . Anyway, enjoy, please do comment on them.
 Logged

 , Wipe-Out, Pinball Pro: Challenger I, Swords of Fury, Stargate, Party Zone


 ). You know where he took that pic? Right off Riverside drive in Ottawa, so light pollution can be worked around to some extent. Naturally, nothing beats dark skies, but it's not something that's killing.
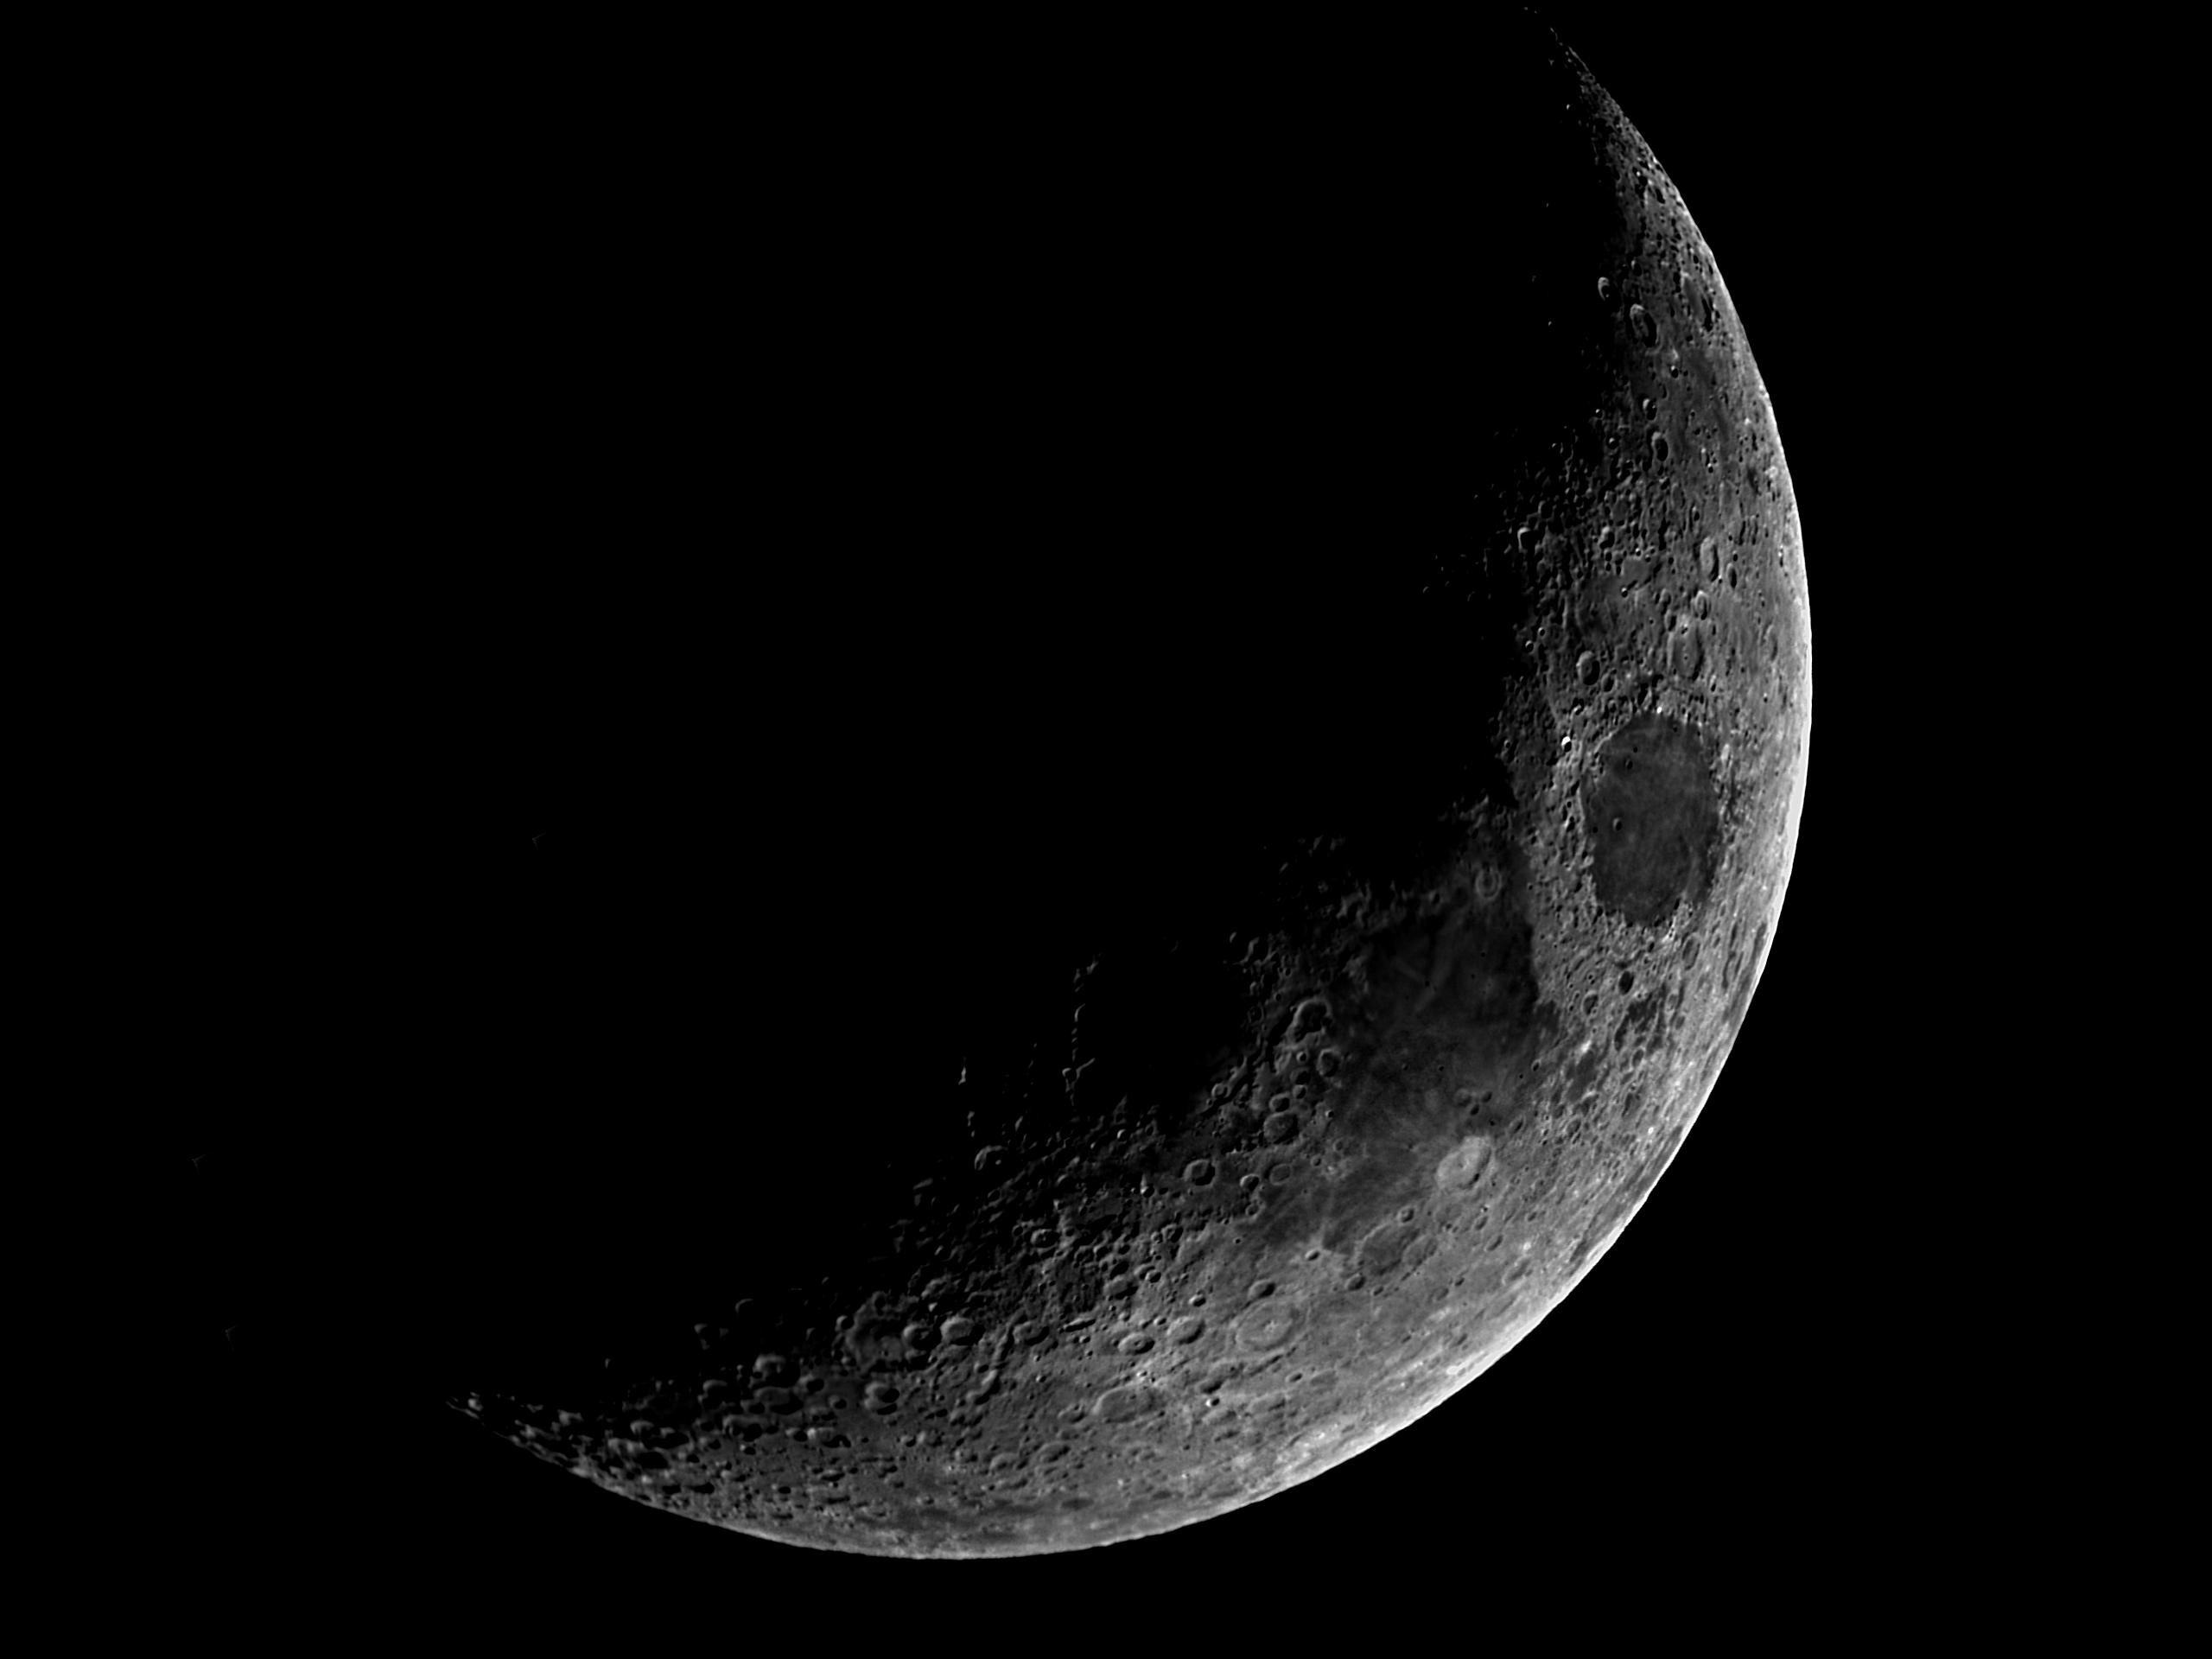

 MAACA ARCHIVES - JOIN THE NEW FORUM AT HTTP://WWW.MAACA.ORG › General Boards › MAACA Forum and Chat › Loaf's new Astronomy thread (with pics!)


